Toto je starší verze dokumentu!
VPN connection
![]() Warning! Eduroam credentials are used for the VPN. More information about eduroam HERE
Warning! Eduroam credentials are used for the VPN. More information about eduroam HERE
The VPN serves to connect the staff or student computer, during travels or from home in a way, that simulates a connection to a local OPFNET network on SU.
Usage
- Make sure that your internet connection is working (home, during travels,…).
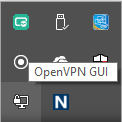
- Right click on OpenVPN icon in the systray a and click on Connect. Alternatively, if you have setup only one connection a double-click will do the same.
- To login, use your credentials for the Eduroam in the form without „@slu.cz“ (for example only xyz9876).
- Icon will turn green after a successful login.
- Now you are connected to OPFNET and have access to the services normally unavailable outside of the faculty.
Installation on Windows OS
For Windows 7 and newer 
Instalace VPN
- Download the newest client installation file.
- You will find the Open VPN GUI on sour desktop after the installation.

- After the startup you will find the client icon in your systray (a computer with a lock). The client is set to start with the OS by default.
- A configuration file must be downloaded HERE.
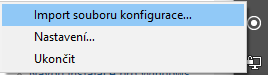
- After downloading the config, right-click on the systray icon and pick „Import comfirugation file“.
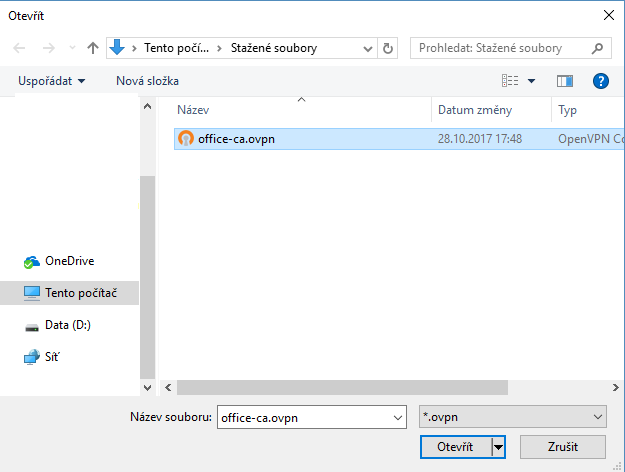
- Pick the file and confim the action.
 ⇒
⇒ 
- Now you can connect as stated earlier in the „Usage“. After filling your Eduroam credentials, wait for the window to disappear. Status of connection can be checked by the collor of the systray icon: Empty = not connected; Yellow = connecting; Green = connected.

- In case of a problem, try to delete the configuration in „%userprofile%\OpenVPN\config“ and repeat the import steps.
Configuration file for Windows (UDP):
Configuration file with built-in certificate can be downloaded HERE
Installation on Linux
- Kernel supporting TAP interface (e.g. 2.6).
- Fedora: yum install openvpn
- Ubuntu: sudo apt-get install openvpn
- Download the config file to /etc/openvpn/
- Run openvpn –config /etc/openvpn/
- You can use the NetworkManager a openvpn module
Installation Mac OS X
- Download the stable version of TunnelBlick and install it. Do not create any connection, just close the app after installation.
- Download the configuration file HERE, unpack, run, use default setting
- Tested with setting showed in this picture. Setting can b accessed by clicking on the Tunnelblick icon and by picking VPN Details.

- Run TunnelBlick, login with your Eduroam credentials as stated in the „Usage“.
Připojení síťových disků (nepovinné)
Po připojení k OpenVPN je možné se připojit k souborům na síťových discích Novellu i bez Novell klienta přes protokol CIFS. Pro připojení využijte tyto příkazy. Ověřujte se svým CRO jménem a heslem.
net use l: \\edmundo\users
net use g: \\edmundo\data\app
v připadě problémů můžete zkusit IP serveru, případně zapnout podporu LM i NTLM podle návodu zde
net use l: \\193.84.208.7\users